
Meshtastic Quick Start
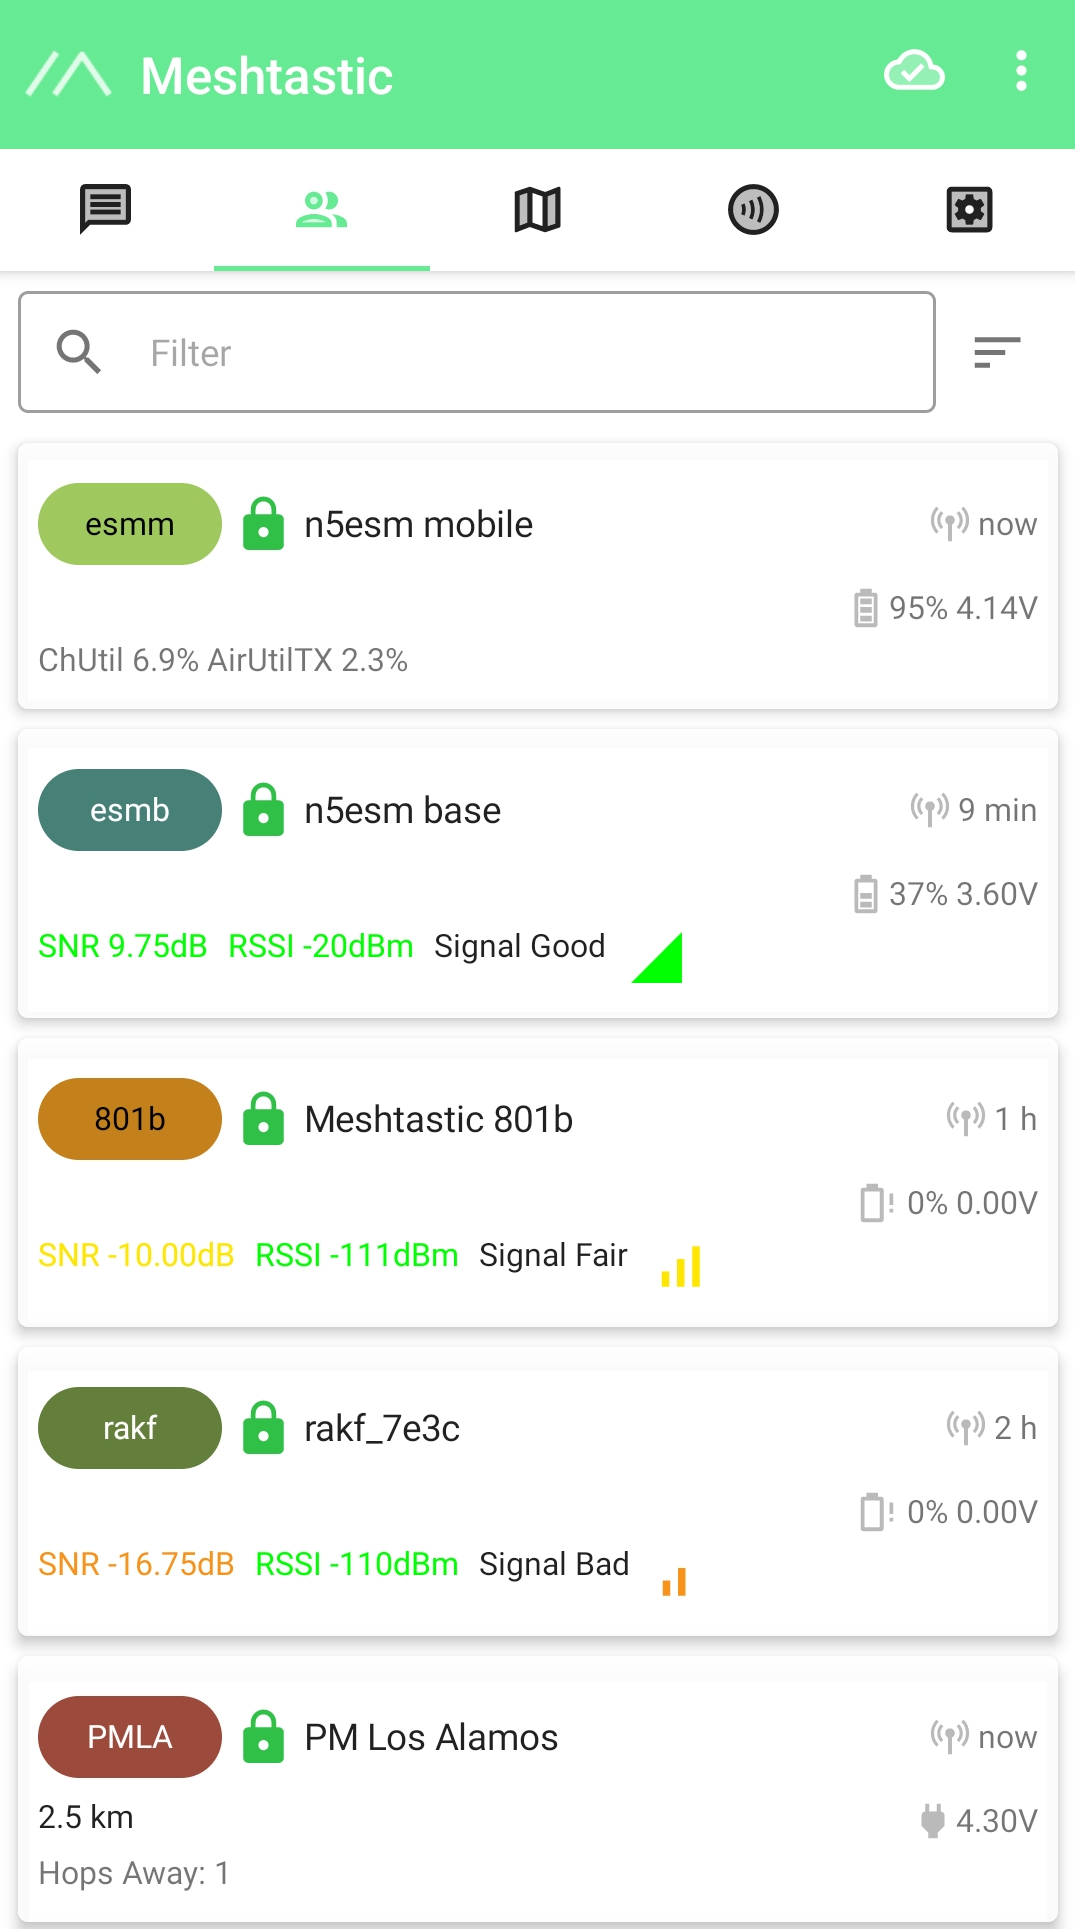 Meshtastic Android app
I’ve started playing with Meshtastic. It works pretty well in Los Alamos because there seems to be an active community who have set up, and who maintain, repeaters in high places. There’s also a very active community in Albuquerque, but that’s not important for my purposes.
This is a quick intro on what I got and how I set it up. It is intended for area volunteers interested in using Meshtastic for emergency management, backcountry communications, and for events such as JMTR where ham radio coverage is spotty.
Overview
First: I’m no expert. There may be mistakes below. Or, maybe things have changed since I wrote it (June 2025, meshtastic v2.6.4). If you find any problems, please let me know.
Meshtastic is software that runs on inexpensive low-power radios gizmos. The radios talk to each other, mesh style: messages go out to whatever neighbor radios are in range, typically your neighborhood and nearby high points like Caballo. These radios then rebroadcast your message to their neighbors, for a max of three hops. What I’ve seen so far is, this lets you go far (Albuquerque, southern Colorado) but can also let you go near, into canyons with no other means of communication. That’s what interests me.
The radio gizmos hook up to your phone via Bluetooth, but the phone is just a controller: all comms happen between gizmos. You can send direct messages to another gizmo, or on a channel (public or private) that will go to other gizmos. HOWEVER: message delivery is not guaranteed. There is no store-and-forward. In a small local area it is very likely that messages will make it, but not 100%.
You probably want to get at least two units, for testing purposes.
What to Get: Hardware
Expect to spend about $100.
 My units
I purchased a Seeed SenseCAP T1000-E and a RAK WisBlock kit. I super super super strongly recommend the Seeed, but they each have their pros and cons:
| Seeed T1000 | RAK WisBlock | |
|---|---|---|
| Battery life | 2 days | 6-7 days |
| Portability | super | none |
| Waterproof | IP65 | none |
| Cost | $40 | $40 |
| Extendability | none | great |
| GPS | yes | none (extra option) |
| Display | none | none (extra option) |
| Cable | proprietary | normal USB-C |
If you’re the kind of person who likes 3d printers and soldering and DIY and spending money on add-ons, get a RAK! Otherwise, get two T1000s. Or a T1000 and something else. If you’re flush with money, get one or two extra T1000s: if you go into deep remote canyons on out-and-back trails, you can hang one from a tree to act as a lightweight waterproof repeater.
Whatever you get, make sure that it’s 915 MHz, and that it includes Bluetooth. For a mobile unit, make sure it has GPS.
Expect about a week for shipping.
What to Get: Software
Meshtastic app, for Android or iPhone.
(Infrequent, unnecessary for getting started): If you’re most people, you can use a Chrome-based browser for connecting to your radios via USB for upgrading or backups. I am not most people, I do not have any Chrome browsers, and I prefer command-line anyway. For people like me, install the python cli in a venv.
Initial setup
BEFORE YOU START: my instructions below are simple, but will share your GPS location with all nearby nodes. If you don’t want to do that, read these instructions and decide how comfortable you are with them. It’s not hard, but it’s fragile and intimidating for a first-time setup. Or, alternatively, disable GPS broadcast (see step 3 below).
The Seeed and RAK both come with an old version of Meshtastic preinstalled. You will want to upgrade them, but that can wait. Right now, your first priority is to get a feel for them. This is a quick start.
-
Connect to your phone: Open Meshtastic app, go to the cloud menu (bottom right), tap the ‘+’ (plus) icon at bottom right, and pair using Bluetooth. (Code is
123456). You will be forced to set a Region:US, obviously. -
Set device name: Default is ‘Meshtastic xxxx’ which makes it impossible to recognize yourself. Go to the three-dot menu at top right, select Radio configuration, then User, then set a Long name and Short name. (I have
n5esm mobileandn5esm basefor long names,esmmandesmbfor short. Pick something meaningful to you, whatever you like. You can change them any time.) DO NOT ENABLE THE LICENSED AMATEUR RADIO SWITCH. That’s a can of worms that I may dive into one day but not yet. Press the Send button: this bluetooth-sends your changes to the radio and reboots it. Reboot is quick but it will take 10-15s for your phone to reconnect. After rebooting, to get the short names on your cloud list, you will need to go to the cloud icon, disconnect bluetooth, then press SCAN. -
Disable GPS (optional): if you don’t want your position broadcast, go to Radio configuration > Channels > LongFast and disable Position enabled. You might also want to go to Position > GPS mode and set it to DISABLED.
-
Check it out! Use the back arrow at top left to get to the cloud menu. You will see your newly-picked long name in the “Your name” box. Now tap the two-people-silhouette icon on the bottom menu bar. You should see a list of nearby nodes, with yours at top. Most will have
Hops away: 1 or 2 or 3at bottom left. A few will not: those are your neighbors, within immediate range. Yay, you’re live! Now click on the folded-map icon on the bottom bar and play with the map. This is just a for-run FYI, you won’t actually be doing much with this info. -
Talk to people? If you’re social and chatty, go to the speech-bubble icon, click on LongFast, and send out a hello message. I haven’t done this. [UPDATE 2025-07-03] If you want to talk to me, create a
JMTRchannel with empty PSK and send a message on that channel.
Repeat the above steps for all your radios.
Once you have multiple radios paired to your phone, you can switch
between them via the cloud menu. AFAIK there is no way to
be connected to multiple radios at once; this means you can only
get alerts (like, messages) for one radio. So, I stay connected to
n5esm mobile.
HINT: radio names in cloud page (not critical; save this
for a rainy day). The cloud page shows your radios with
names like ‘Meshtastic xxxx’ and ‘Meshtastic yyyy’. This is stupid.
To get names like ‘yourshortname_xxxx’ and ‘yourshortname_yyyy’,
tap the + (plus) icon at bottom. A popup will appear, showing
the shortname of your non-connected radio. Hit Cancel. Then
connect to your other radio(s) and repeat the +/Cancel thing.
Radio names will now be better.
First Test
Once you have two radios configured, talk to each other:
-
In Meshtastic app, in the two-people icon menu, find one of your radios. Tap the colored oval on left. This brings up a menu. Tap ‘Direct Message’.
-
In the text box at bottom, enter something and press the green arrow. A text bubble will appear, watch the right-hand side closely! It will go from cloud, to cloud with checkmark, to person silhouette with checkmark. This indicates delivery to the other node. Yay!
-
In Meshtastic app, go to cloud menu then click the radio button for your other (recipient) device. Wait ~15s, you’ll see progress messages. When loading finishes, you should get a popup alert on your phone with the new message contents. Tap it, or just go directly to the speech-bubble menu and tap on the entry for your other radio.
If you only have one radio, feel free to message me (n5esm mobile).
If I’m within range, I will reply.
Tests from the field
Take your mobile unit out with you on a hike. Send messages to your base unit(s) or, even better, to someone else. Watch the cloud icon in the text bubble: cloud-with-slash means your radio could not reach any other radios, so your message was not relayed. Cloud-with-checkmark means your message made it out to at least one node.
More…
Set up a private channel
Like a group chat. Private comms between two or more individual radios. Why? The principal advantage over point-to-point is that with a private channel you can send GPS coordinates. To loved ones, or for mapping purposes, or just to share. Follow the channel docs.
Upgrade
Meshtastic is under active development. Check for updates, then follow the drag and drop upgrade instructions (basically, connect via USB, press a button on the radio, this makes the radio appear as a USB Mass Storage drive. Copy a firmware file to that drive. It’s as simple as that). Or, use Chrome if you wish.
Range Testing
UPDATE 2025-07-02: Never mind. This does not do what I thought it does: the Range Test module only works between two nodes. Messages do not get repeated. So all you can test is line of sight between two gizmos. Useful, but not what I wanted. What I wanted is:
Coverage Maps
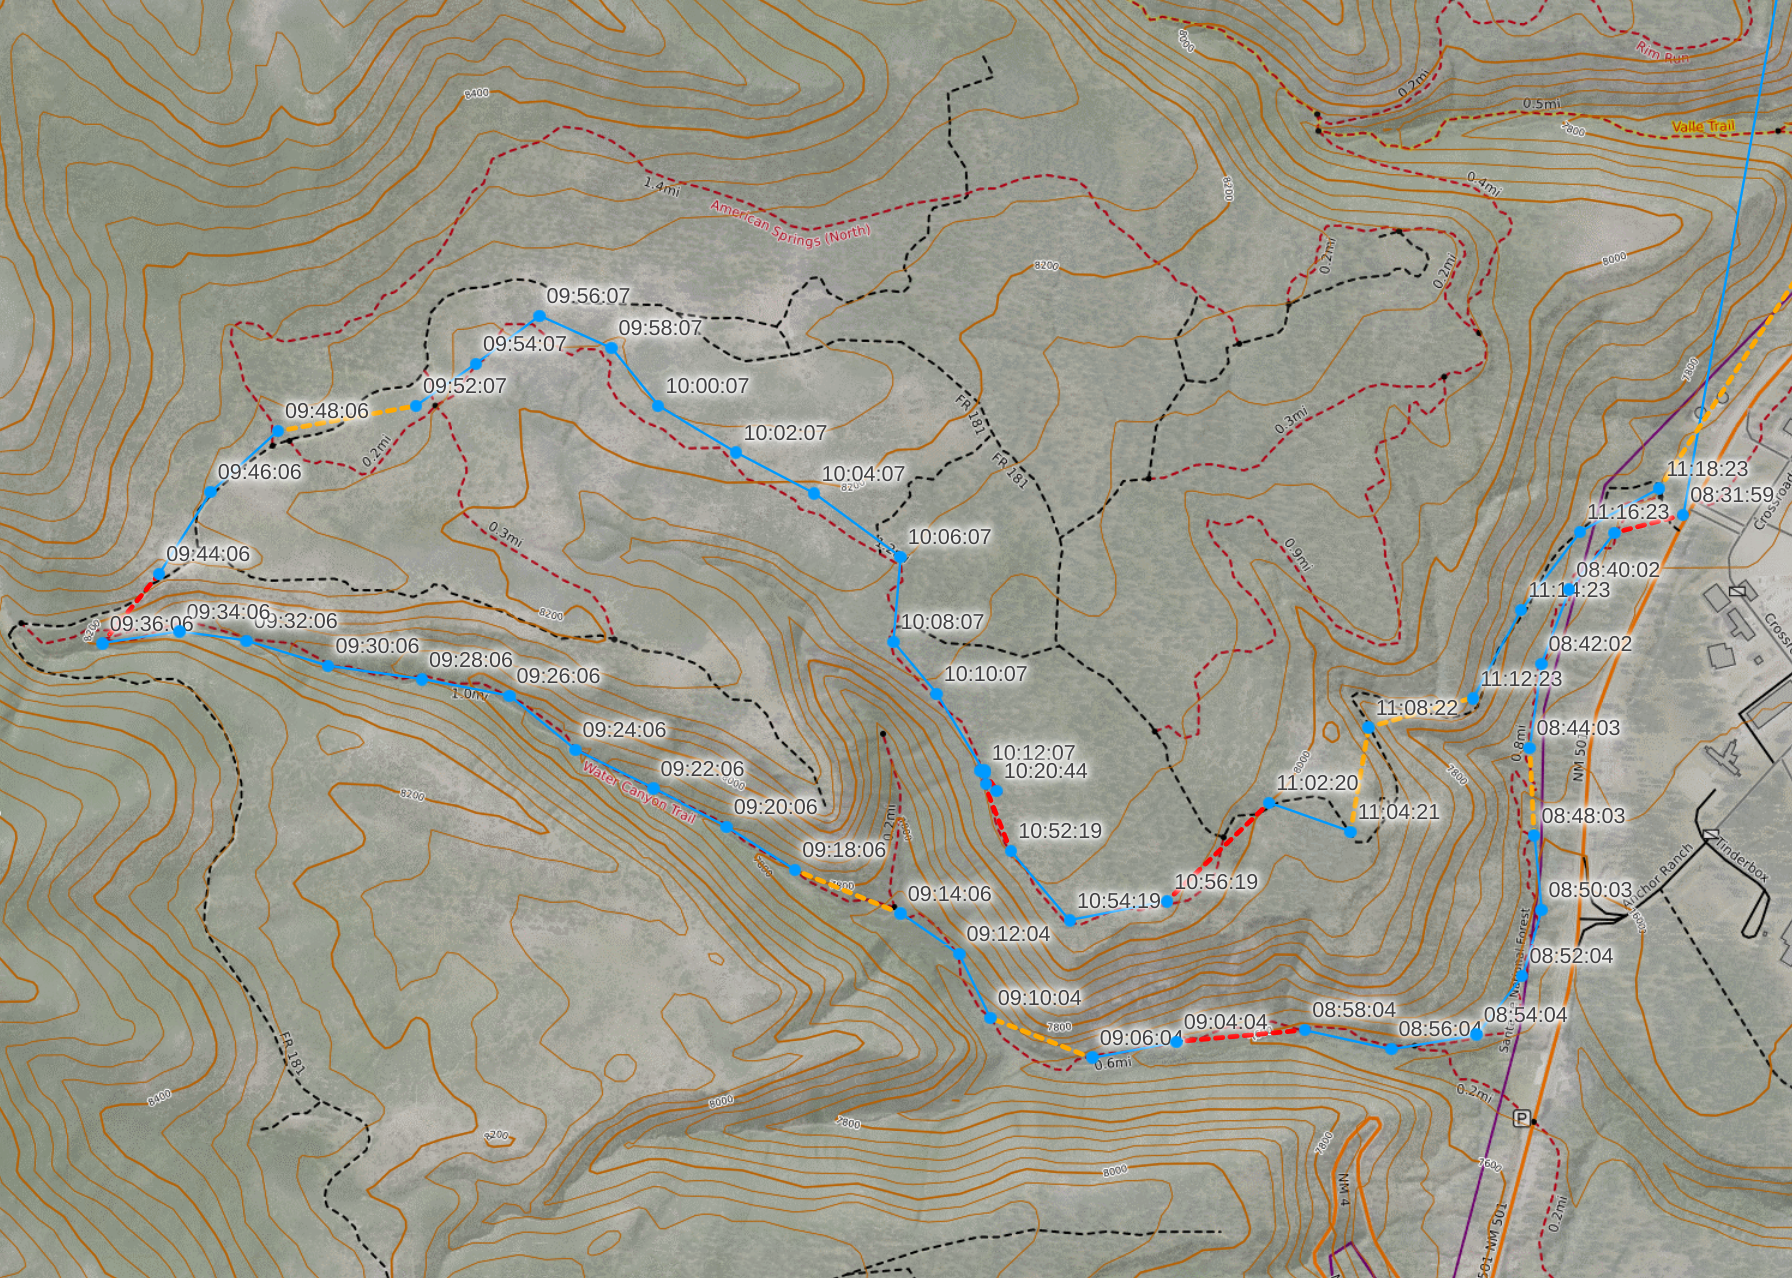 Water Canyon coverage map
UPDATE 2025-07-02: Take your mobile unit with you on a hike, and get a map of coverage as well as gaps.
The mobile unit sends periodic pings with GPS coordinates. Your base unit receives and logs these, and you can then plot on a map. On July 2 2025 I tested Water Canyon, which has several spots with no cell coverage. See Water Canyon hike map on SARtopo. I got lucky: there was a traffic jam due to a bus/car crash, so I spent a long time by the skating rink and managed to send some pings from there. That’s a JMTR dead area (no repeater coverage) but it seems to work fine with Meshtastic.
UPDATE 2025-07-21: I hiked Mitchell to Guaje Ridge to the Dam, up canyon, to Rosie’s Point, Pipeline, then back to Guaje Ridge and Mitchell TH. Results are quite promising! Guaje Dam AS gets perfect coverage, as does most of Guaje Canyon. The old Pipeline AS does not get coverage, but there’s coverage nearby. HOW TO READ: purple is my high-precision GPS track. Blue dots are pings from my T1000 radio. Blue lines between dots mean no gaps; orange means one packet lost; red is 2 packets lost; black XXXX means more than two packets lost. Note that the GPS on the T1000 leaves much to be desired, but I still think it’s good enough for race purposes.
I will continue to play with coverage maps over the next months.
Repeaters
You can get (or build) solar-powered units for your rooftop or a nearby high place. That’s way beyond the scope of this post.
Have fun!
Changelog
-
2025-07-21
- added Mitchell, Guaje Canyon, Pipeline, and Guaje Ridge loop
-
2025-07-03
- removed Range Test info, added Coverage Maps instead with map of Water Canyon.
- documented JMTR channel as a way to test.
- Android app changed since my first writeup. Reflect app changes.
